Drupal 7 is getting long-in-the-tooth. However, I use it for a couple of sites I manage, so simplifying management of these sites including upgrades/updates and security fixes remains a priority.
Since installing the older version of drush required for drupal 7 wasn’t currently documented, at least for my host (opalstack), this is how I install a global version for all sites installed for a given shell user.
As of this writing the most current version of drush that works with drupal 7 is 8.4.11.
From the command line, for the specific shell user for that app (each app should have its own shell user for security):
mkdir ~/drush
cd ~/drush
composer require drush/drush:8.4.11
So I decided I needed more upper body strength. So I thought something fun I could do is build a pull-up bar, and track my ability (or inability) to do pull-ups. It was a much bigger project than I thought it would be. Here’s a quick write-up of my experience. Pictures and video are here too!
I viewed a ton of YouTube videos and online DIY instructions. I also put up a “test” post with no requirement for strength or endurance to learn how to pour concrete. This was all useful, but there were some huge caveats for me making this less applicable:
The ground is wicked hard in my backyard. Like impenetrable beyond 29″ in depth.
I’m kind of tall (6’5″), so setting the bar height correctly uses up all available height of a 12′ piece of lumber.
COVID has made lumber hella expensive. Like, three times the budget in the DIY videos.
Threaded pipe uses a tapered thread. I didn’t know that. Pipe is spec’ed by inner diameter, not outer diameter (rods, on the other hand, are outer diameter). I didn’t know that, either.
Design
So my initial goal was to use 5″x5″s or 6″x6″s, but the aforementioned COVID lumber cost spike put those out of budget. So I resigned myself to 4″x4″ (actually 3.5″ on finished side) and hoped for the best.
I wanted to dig 3′ holes into the ground. That wasn’t going to happen, after some blood sweat and tears. Blasting is out of the question. I toyed with the idea of putting rebar into the granite (epoxied in) and then pouring concrete on the rebar, strengthening a weaker base. Unfortunately, the “granite” wasn’t actually solid granite, so there would be nothing to bond into. So my two holes are 28″ and 29″ deep respectively, which is where I hit this weird hard surface that’s not actually granite (some folks have said this is something called decomposed/decomposition granite, but I haven’t actually researched it).
My clever idea was to strengthen the design by using the flanges on the outside of the bar, so that the hole in the wood does the weight bearing. Folks smarter than me will already have worked out why this was painful: The flanges are threaded to go on the other way onto the tapered thread. I had to get the pipes rethreaded (I hate Home Depot) by a competent plumber with the reverse taper.
My test post taught me a lot about pouring concrete. I was determined to mix the concrete in the hole. The test post taught me the layering had to be slow and methodical, with plenty of mixing.
Drilling the holes turned out to be the second toughest part of the build. Finding the center of lumber is actually…. hard. 3.5″ is only the rough dimension of a 4″x4″, and the curvature on the edges makes finding the exact center very tough. Also, the portable drill press I borrowed off a neighbor had only 1.5″ of travel, requiring repeated step-ups, bracing, and clamping to drill all the way through. Needless to say, my holes were not great, one is not centered as it emerges from the lumber. Doing it again I would take the lumber to someone with a fixed drill press (2 hours to drill two holes!).
Sizing
Per all the online resources, the bar should be ~1″-1.5″ diameter, 48″ long (the grabby portion). I have big hands, so probably on the higher end of this which works with my 1.3″ diameter pipes (outer)
Per the online resources, you could just put the bar at 8′ and call it good, if you’re average height. The measurement technique suggested is the your height to your middle finger on tip-toes plus two inches. This is 95″ for me = 8 3/4′.
Building
I dug the holes in the ground with a thin shovel, (borrowed) post-hole digger, and some miscellaneous attempts with a (borrowed) hammer drill (mainly to loosen up soil).
I drilled the holes in the wood with a (borrowed) portable drill press, (borrowed) Forstner bits (nifty).
Time
This took me way too long to build. But I learned a ton. So there’s that. I started June 10th, finished June 25th, with many trips to lumber stores, Home Depot and our awesome local hardware store: McGuckins.
Video
Conclusion
It’s done. Let’s see how long it lasts! Hope this was useful to someone, and they can learn from my mistakes.
Canon PIXMA printers are equipped with three types of connections: USB, WiFi and Ethernet (wired). I try and keep EVERYTHING I can off my WiFi, so I wanted to make the wired Ethernet connection work.
From the factory, the wired Ethernet connection is disabled (stupid) and doesn’t automatically enable itself until you do the following:
Turn printer on. Wait for it to do its stuff and be on (about 30 seconds)
Hold down the paper feed button until the power light blinks EXACTLY 11 times. It’ll respond by blinking afterwards.
Turn printer off. Wait for it to shutdown gracefully
Turn it on again, wired LAN should be active.
To verify, hold down feed button for exactly 6 blinks. It’ll print out a settings page, wired should be marked as “active”.
Apparently this may also be possible from deep within the settings once WiFi is active, but really? Also, it appears impossible to have both WiFi and wired active at the same time (no big loss, but WHY?)
I decided to do some research on the *right* way to set up wireless networks when you have multiple standards, multiple access points, multiple bands and a (fairly) large area to cover. There doesn’t seem to be one right answer, but here’s my old setup and new setup. This all seems to track nicely, WPA2 identical password and same SSID for all variants.
Old setup (limited in main building by old wiring limiting maximum backhaul to 100 Mbit/s Ethernet)
Linksys (hacked for high power) WAP54g (single band) in main building – kabal-wireless (802.11g, 2.4GHz only)
Apple Airport Express in main building – kabal-wireless-n (802.11n, simultaneous 2.4GHz & 5 GHz) running in dumb mode
NetGear WNR2000v1 N300 in garage office – kabal-wireless-n (802.11n, simultaneous 2.4GHz & 5 GHz) probably running as a router
New setup (Gigabit Ethernet wired backhaul for everything)
Zyxel NWA1123-AC – kabal-wireless in main building living room (simultaneous 802.11a/b/g/n/ac, 2.4GHz and 5 GHz)
So with the new setup, there’s 1 SSID for everything, and one password using WPA2 authentication. 2.4 GHz channels are set to the only nonoverlapping channels (1,6,11). 5 GHz channels are auto-assigned (and non-overlapping). For the most part clients seem to deal with roaming well, unlatching and latching onto access points (relatively) seamlessly.
Notes (the good, the bad and the ugly)
Throughput on 802.11ac is close to 1 Gbit/s (whoah).
This setup is somewhat at the mercy of crappy clients (802.11b) pulling down the throughput of the access point THEY are connected to. Fortunately, I don’t think I have many left.
Some folks have posited that having separate SSID for a,b,n,ac and 2.4 GHz and 5 GHz is a good thing. Most do not. I think it depends on the quality of your hardware. For example, you’ll often see people with separately named -5 networks.
Many folks name adjacent networks differently. This is annoying. Just thought I’d put that out there.
Don’t use routers as access points. Even in dumb mode bad stuff can happen.
Eventually, I may move the units to 802.11ac APs, but wow, those NWA1123-NIs sure are cheap.
There aren’t a lot of players in the high end access point market: Ubiquiti, Cisco, Engenius, and to a lesser extent, Netgear, Zyxel, etc.
Of course, building a great wireless network in front of a crap router doesn’t help anybody. I use a custom-built pfSense router.
Comcast letting anyone use their neighbor’s bandwidth (default xfinity network) is kind of insidious. It makes me feel dirty, like I’m stealing their internet access.
Update: April 2021
I ditched this entire setup and went with a controller-based access point setup that’s way more seamless and fluid (hand-offs are great). I went with the super inexpensive Omada system from TP-Link. I actually run the controller software on my NAS box.
Pros
Hardware is cheap.
Works really well, device handoff between APs is amazing and “just works”.
I even have an outdoor AP that services my driveway (and passing cyclists via a guest network).
Cons
Need to run controller. I run it on my NAS box.
TP-Link has no Omada hardware for >1 Gbit/s internet access (I currently have access to a theoretical 1.2 Gbit/s from Comcast, and 200 Mbit/s from CenturyLink) They reserve their >1 Gbit/s hardware for their “consumer” devices (which I just don’t get).
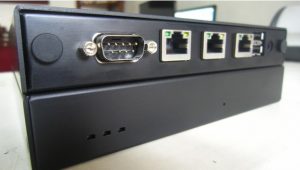
I finally got IPv6 working at home over the weekend. I ended up doing it with custom router hardware from PC Engines (in my case the very capable APU with 4GB memory [$131+$10 enclosure], a 16GB mSATA SSHD [$24.99], and three gigabit Ethernet ports) running pfSense.
This is documented here, so that others may learn from my mistakes. I use wview software running on a Raspberry Pi (RPi). My setup is not the cheapest, but over multiple iterations I have tuned the components to reach the current setup. The total materials in my setup (not including temporary parts and mounting which will vary, will run ~$550 (today).
8GB SDHC Class 10 Transcend flash – $8.63 – Amazon
Davis Wireless Vantage Pro 2 – $387.63 – Provantage
Davis Weatherlink for Vantage Pro USB – $114.95 – Provantage [IMHO a ripoff]
Instructions – google “wview raspberry pi” should get you to a well-written raspberry pi wview setup doc.
You’ll also need a pole, mounting hardware or tripod depending on where you want to mount the weather station. You’ll need an HDMI-equipped monitor or TV to setup the RPi, as well as a USB keyboard with extra USB mouse port (chained) as the RPi only has two USBs. The RPi will need to be hooked up via Ethernet to the internet unless you want to buy one of the wireless adapters too. You’ll need to get an ID from CWOP if you want to publish your data to NOAA, as well as one from WeatherForYou and Weather Underground if you want to publish there too. After you’ve mounted the weather station and sent some data, you’ll need to submit photos of the installation to CWOP.
This is my running log of trying to enable IPv6 at home using a router that is NOT built into my modem. Hopefully this will be successful in short order, and therefore useful to the internet at large.
Disconnecting the RV042, and setting the Q1000 up as a primary router produce positive results on the following three test sites (http://test-ipv6.com, http://ismyipv6working.com, ipv6.google.com) when the router is configured as on this site. This is using a technique called 6rd which is different from 6to4 and 6in4.
So the question is how to configure the RV042 to do this when the modem is in transparent bridging mode. So far, no joy. 5+ hours on the phone with a pleasant Mr. Perez from Cisco support, along with joint conference calls with CenturyLink tech support have not yielded any fruit.
I have signed up for tunnels at SIXXS and Hurricane Electric. I have purchased a VDSL2 modem that does not appear to have routing functionality (not yet arrived as of 10/10/12).
I will continue to update this post as tickets are still open with Cisco and CenturyLink.
Figured I’d write this one out, because I couldn’t find this documented anywhere else. You do NOT need to open a connection FIRST to your local machine, and THEN to Amazon, as I’d been doing:
You can open a connection directly to the remote server:
Copy the .pem file to the ~/.ssh/ directory. Make sure permissions are right: chmod 700 ~/.ssh/[pem file name].pem
Then add the following lines to your ~/.ssh/config: HOST [hostname, * works if you use the same .pem file for multiple hosts] IdentityFile "~/.ssh/[pem file name].pem"
So a friend suggested I document my approach to going to a fully legal, download/streaming solution for all my TV and movie watching.
A little background: I have recently moved from a dual internet connection (CenturyLink 7 Mbit/s ADSL2+, Comcast 2 Mbit/s cable modem, bonded with a RV082 router) to a single 40 Mbit/s VDSL2 connection, because of some compelling pricing arguments (the cable price jumped from $15/month to $40/month). With this, I feel compelled to use this pipe for TV viewing, rather than pay separately for TV and internet. So the total cost of the solution or solutions must be less than the cost of internet and TV.
So here’s the shows my wife and I watch:
The Walking Dead, Dexter, Weeds, The Mentalist, Lie to Me, The Big Bang Theory, Eureka, Breaking Bad, True Blood, The Daily Show, House, The Big C, Community, Parks & Recreation, The Closer, Rizzoli & Isles, Nurse Jackie, Entourage, Curb Your Enthusiasm
Here’s the solutions I’m looking at:
Amazon, Netflix, Hulu Plus, Vudu, AppleTV, GoogleTV
From the start, it’s clear I have an uphill battle ahead of me. The problem is that the majority of these shows, especially the ones I really like are on HBO and SHOWTIME, networks who have notoriously stayed off the internet.