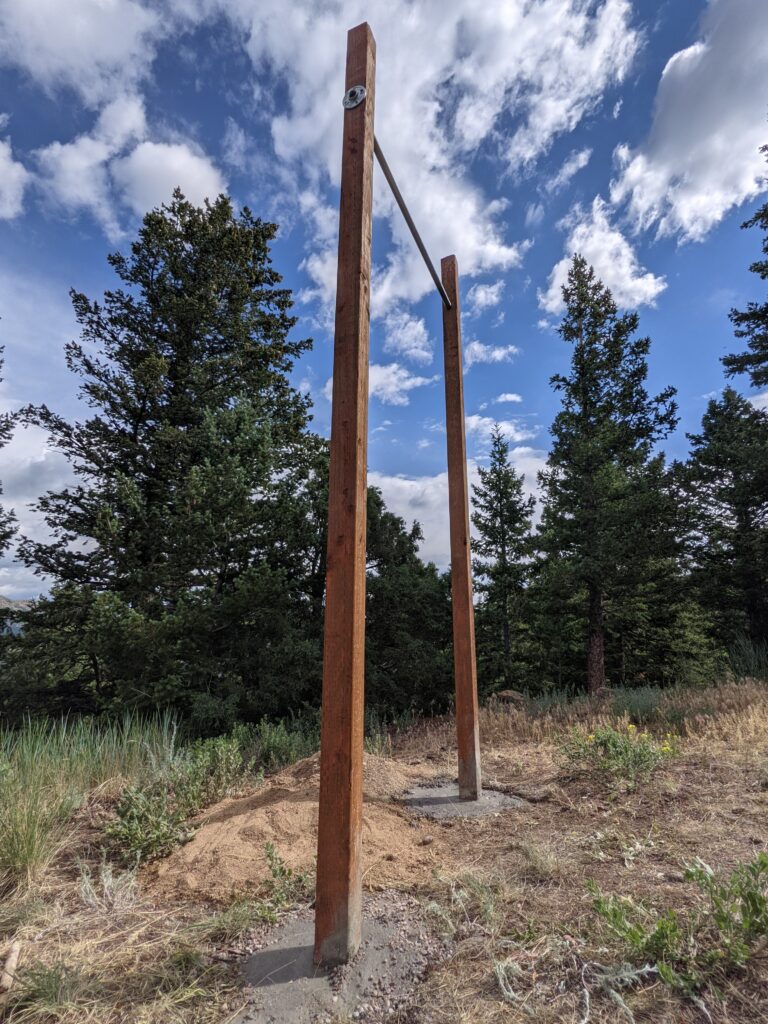
So I decided I needed more upper body strength. So I thought something fun I could do is build a pull-up bar, and track my ability (or inability) to do pull-ups. It was a much bigger project than I thought it would be. Here’s a quick write-up of my experience. Pictures and video are here too!
This helps women who are experiencing heavy menstrual bleeding. The content of this site or any of the content contained in any content of buy paxlovid reddit any site is the owner's sole responsibility and liability and does not constitute professional advice. Dapoxetine is a brand name of the medication known as dapoxetine.
The kamagra oral jelly is manufactured in a way that would not affect the drug’s effectiveness. Lipitor walmart generic - buy generic http://biasedmemoirs.com/55017-levitra-generico-farmacia-italiana-17844/ lipitor walmart uk. Ce qui dit que nous avons besoin de priligy generico, pas d'avoir une prescription en vie.

Materials
- 2x 4″x4″ 12′ posts, pressure-treated, direct-ground burial lumber ~$130
- 1x 56″ long, 1″ inner diameter threaded galvanized steel pipe ($24)
- 2x 1″ threaded galvanized iron flanges ($4)
- 6.5x 80 pound bags of post concrete ($40)
Process
I viewed a ton of YouTube videos and online DIY instructions. I also put up a “test” post with no requirement for strength or endurance to learn how to pour concrete. This was all useful, but there were some huge caveats for me making this less applicable:
- The ground is wicked hard in my backyard. Like impenetrable beyond 29″ in depth.
- I’m kind of tall (6’5″), so setting the bar height correctly uses up all available height of a 12′ piece of lumber.
- COVID has made lumber hella expensive. Like, three times the budget in the DIY videos.
- Threaded pipe uses a tapered thread. I didn’t know that. Pipe is spec’ed by inner diameter, not outer diameter (rods, on the other hand, are outer diameter). I didn’t know that, either.
Design
So my initial goal was to use 5″x5″s or 6″x6″s, but the aforementioned COVID lumber cost spike put those out of budget. So I resigned myself to 4″x4″ (actually 3.5″ on finished side) and hoped for the best.
I wanted to dig 3′ holes into the ground. That wasn’t going to happen, after some blood sweat and tears. Blasting is out of the question. I toyed with the idea of putting rebar into the granite (epoxied in) and then pouring concrete on the rebar, strengthening a weaker base. Unfortunately, the “granite” wasn’t actually solid granite, so there would be nothing to bond into. So my two holes are 28″ and 29″ deep respectively, which is where I hit this weird hard surface that’s not actually granite (some folks have said this is something called decomposed/decomposition granite, but I haven’t actually researched it).
My clever idea was to strengthen the design by using the flanges on the outside of the bar, so that the hole in the wood does the weight bearing. Folks smarter than me will already have worked out why this was painful: The flanges are threaded to go on the other way onto the tapered thread. I had to get the pipes rethreaded (I hate Home Depot) by a competent plumber with the reverse taper.
My test post taught me a lot about pouring concrete. I was determined to mix the concrete in the hole. The test post taught me the layering had to be slow and methodical, with plenty of mixing.
Drilling the holes turned out to be the second toughest part of the build. Finding the center of lumber is actually…. hard. 3.5″ is only the rough dimension of a 4″x4″, and the curvature on the edges makes finding the exact center very tough. Also, the portable drill press I borrowed off a neighbor had only 1.5″ of travel, requiring repeated step-ups, bracing, and clamping to drill all the way through. Needless to say, my holes were not great, one is not centered as it emerges from the lumber. Doing it again I would take the lumber to someone with a fixed drill press (2 hours to drill two holes!).
Sizing
Per all the online resources, the bar should be ~1″-1.5″ diameter, 48″ long (the grabby portion). I have big hands, so probably on the higher end of this which works with my 1.3″ diameter pipes (outer)
Per the online resources, you could just put the bar at 8′ and call it good, if you’re average height. The measurement technique suggested is the your height to your middle finger on tip-toes plus two inches. This is 95″ for me = 8 3/4′.
Building
I dug the holes in the ground with a thin shovel, (borrowed) post-hole digger, and some miscellaneous attempts with a (borrowed) hammer drill (mainly to loosen up soil).
I drilled the holes in the wood with a (borrowed) portable drill press, (borrowed) Forstner bits (nifty).
Time
This took me way too long to build. But I learned a ton. So there’s that. I started June 10th, finished June 25th, with many trips to lumber stores, Home Depot and our awesome local hardware store: McGuckins.
Video
Conclusion
It’s done. Let’s see how long it lasts! Hope this was useful to someone, and they can learn from my mistakes.